
I don't know...I just find it classy.
Do you remember this corrector fluid? Are you one of those silly kids who play with them and use them as a nail polish? raise your hand if you do! lol!
 |
| liquid corrector fluid |
I couldn't hold on to anything, saving my well groomed nails from a disaster.
I remember my Mom scolding me for keeping my clay for too long, keeping them longer than usual so I can apply them to my nails all over again.
I told myself that when the right time comes and I started working, I will always have french manicure.
And so I did.
And so I did.
Having your nails well groomed is a part of my job! Up to this date, I never visited a salon to have my nails done, except of course when I'm in Manila. I am not saying I will never ever visit one, guess what? I might...one of these days out of curiosity.
My Korean colleagues taught me to always apply a base coat before a nail color.
So you have to keep a 3 step in coloring your nails.
A BASE COAT, NAIL COLOR AND A TOP COAT : I've never heard of this back in Manila! Or I might not be aware of it. when I do my nails I just jumped right into applying my preferred color. The reason behind applying a base coat is preventing your nails from yellowing especially if your using colored polishes than nude ones. Your nails are merely stained from the polish and will return to their normal shade if they are left unpolished for a while.
I also tried having fake nails previously. First, during our honeymoon in HK. The nails was just pressed against mine without altering it a bit. It look so huge!!! end of story I have it removed in less than 24 hours, and paid double. So I told myself that I'd rather do everything myself cause I always end up feeling sorry. After that horrible experience in HK. I tried applying fake nails many times.
One of the greatest experiences I have learned being away from home, was learning new things on my own. It also saves you bucks from spending?
My Korean colleagues taught me to always apply a base coat before a nail color.
So you have to keep a 3 step in coloring your nails.
A BASE COAT, NAIL COLOR AND A TOP COAT : I've never heard of this back in Manila! Or I might not be aware of it. when I do my nails I just jumped right into applying my preferred color. The reason behind applying a base coat is preventing your nails from yellowing especially if your using colored polishes than nude ones. Your nails are merely stained from the polish and will return to their normal shade if they are left unpolished for a while.
I also tried having fake nails previously. First, during our honeymoon in HK. The nails was just pressed against mine without altering it a bit. It look so huge!!! end of story I have it removed in less than 24 hours, and paid double. So I told myself that I'd rather do everything myself cause I always end up feeling sorry. After that horrible experience in HK. I tried applying fake nails many times.
 |
| in HK back in 2007 |
 |
| about to be removed |
here's how I made mine
After you thoroughly clean your nails with a cuticle remover. I like to dip my nails back into a bowl of water to soften them and remove any rough areas. It's like having a second check.
 |
 |
| get ready to be nipped out! |

After removing all those rough thingy. Get your preferred nailpolish ready!
I always like mine to be sheer. But you can make it as natural as possible.
I used Chic colorless with a hint of tint as a base coat.

Now get ready your tape and cut it into strips.

Let your nails completely dry from the base coat before applying the tape.
 |
 |
| colorless top coat, Sally Hansen's white tip applicator, nude sheer polish |
so where were we? after your base coat have completely dry. apply your white liner tip.
let it dry completely before stripping the tape.
Remember : don't put too much tip as it will go with the tape the moment you strip it off. If you smudge, you need to do it all over again.
let it dry completely before stripping the tape.
Remember : don't put too much tip as it will go with the tape the moment you strip it off. If you smudge, you need to do it all over again.


.
I made this version long time ago. In this picture, my nails are longer than usual. So if I just apply colorless as a base coat. My natural nail will be seen at what length it is. So I apply a beige color. Notice how I made them as thin as possible.
I made this version long time ago. In this picture, my nails are longer than usual. So if I just apply colorless as a base coat. My natural nail will be seen at what length it is. So I apply a beige color. Notice how I made them as thin as possible.
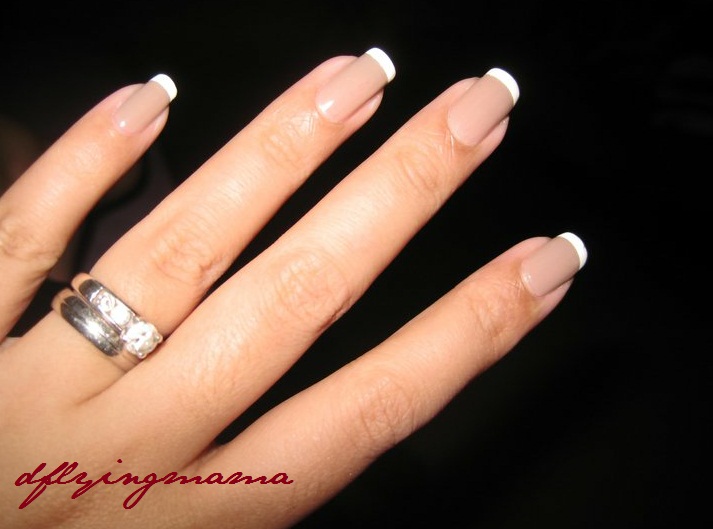 |
| base coat : colorless, nail color : beige, sally hansen's white liner tip, finish it off with your top coat. |
No comments:
Post a Comment